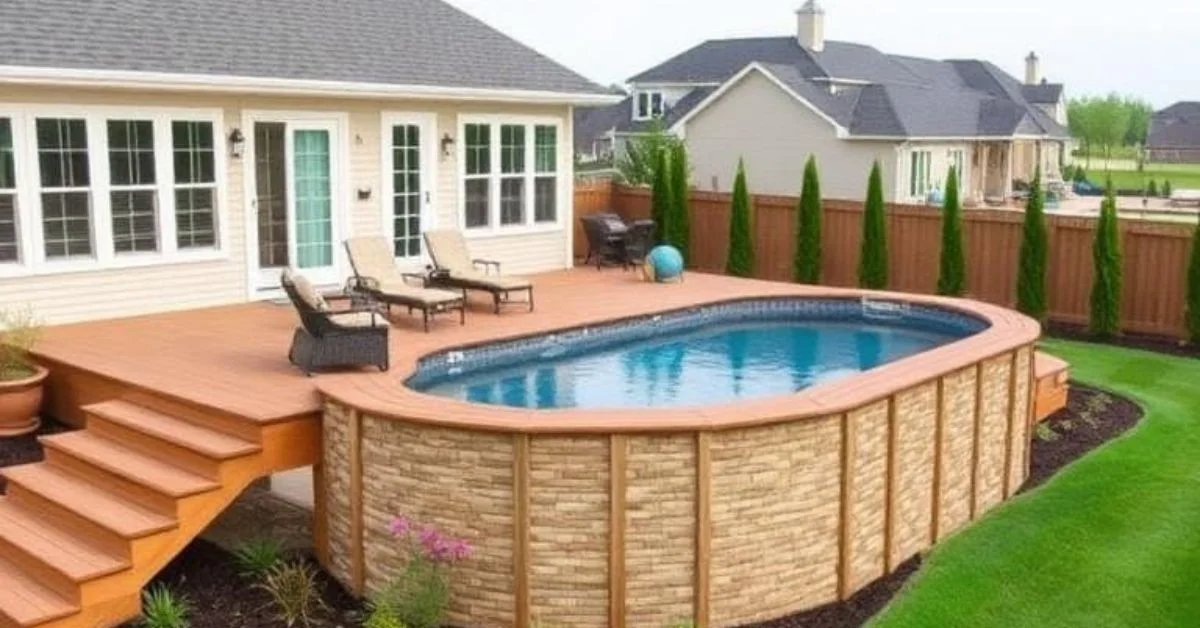
21 Above Ground Pool Deck Ideas That Look Built-In
Above ground pool deck designs can make a raised pool read as built‑in by aligning decking with the pool rim, adding ventilated skirting, and integrating steps, benches, and planters. Choose capped composite or PVC for humidity resistance, or pressure‑treated timber for lower cost. Frame with ledger or floating joists, include lateral bracing, and provide hinged bench storage for pumps and chemicals. Use full wrap, partial wrap with a sunken landing, or multi‑level terraces to create depth. Finish with non‑slip boards, code‑compliant railings, and landscape screening. Expect a skilled crew to complete a 12–18 ft wrap in one to two weeks.
21 Approaches to Achieving a Flawless
Full Encirclement Designs
These designs treat the pool as the absolute center of a new, raised landscape. They demand the most material and framing precision but yield the most dramatic transformation.
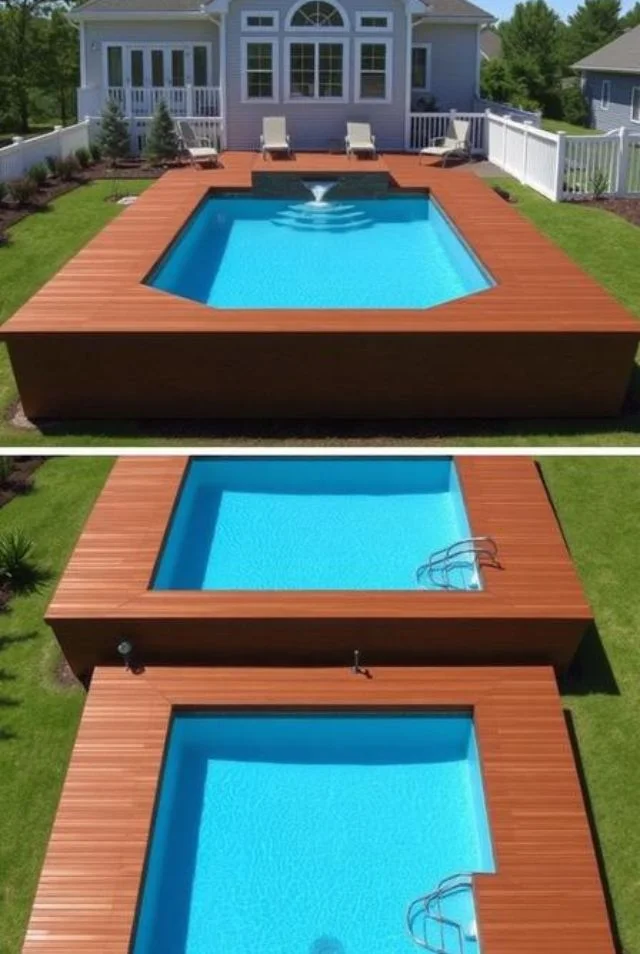
1. The Continuous Flush Overlap
This is the gold standard of built in illusion. The deck boards are extended precisely over the pool’s top rail, leaving a controlled 1/2 inch expansion gap. This gap is critical: it allows the wood or composite to breathe without rubbing against the metal pool wall. When executed correctly, the water surface becomes a visual extension of the deck plane. This requires a circular or segmented beam structure built with short, straight joist sections rather than trying to bend solid lumber.
2. The Tiered Terrace Approach
Rather than one monolithic deck surface hovering four feet off the ground, this design introduces multiple levels. The top level meets the pool rim flush. A second, broader level sits 8 to 12 inches lower, creating a natural delineation between the “wet zone” and the “lounge zone.” This method reduces the perceived height of the structure, eliminates the need for a towering perimeter guardrail in some areas, and provides built in bench seating at the step transitions.
3. The Hillside Integration
If your property features even a slight slope, you possess the ideal conditions for a true inground illusion. By excavating the uphill side of the pool footprint and building the deck to bridge from the high ground to the pool rim, the deck becomes a grade level patio on one side and an elevated overlook on the other. The downhill side of the pool can be concealed using segmental retaining wall blocks, effectively burying the pool wall and creating a visual anchor point.
4. The Octagonal Framing Method
Curved deck boards are expensive, labor intensive, and prone to cupping. For round pools, an octagonal or dodecagonal (12 sided) deck frame is the professional standard. By constructing a series of angled framing bays using 22.5 or 45 degree joist hangers, you create a faceted perimeter that hugs the curve of the pool closely while utilizing only straight lumber. The gaps between the angled frame and the round pool are then covered with a wide fascia board, hiding the complexity beneath.
5. The Narrow Service Walkway
This is the minimalist’s encirclement. It consists of a 3 to 4 foot wide boardwalk that runs 360 degrees around the pool. It is not designed for lounging but for maintenance access and visual continuity. By keeping the deck narrow, the load on the footings is reduced, and the overall cost of premium decking material is cut significantly. It allows you to mow or weed eat right up to the deck edge without damaging the pool wall.
6. The Elevated Planter Integration
Surrounding the pool with a deck often creates a steep, blank vertical drop of pressure treated skirting. Instead of just installing lattice, this design frames out deep, structural planter boxes along the deck perimeter. These boxes are lined and filled with a lightweight growing medium. Trailing plants like Creeping Jenny or Sweet Potato Vine spill over the edges, softening the hard lines of the deck and absorbing the visual impact of the vertical rise.
Partial Footprint Configurations
Not every yard or budget can accommodate a full wrap. These configurations maximize impact by focusing the deck area on the primary activity zone.
7. The Half Moon Leisure Deck
This deck wraps 180 degrees around the sunniest or most accessible side of the pool. It provides ample space for chaise lounges and entry stairs while leaving the back half of the pool exposed for equipment access and plumbing runs. This is an efficient use of space, especially in yards where the pool is offset to one property line.
8. The Corner Infill Strategy
Placing a round pool in a corner creates an awkward, wasted wedge of space. A corner deck fills that triangle perfectly. The deck attaches to the two intersecting fence lines (or stands free just inside them) and meets the pool at a tangent. This transforms a dead zone into a private, tucked away seating cove.
9. The Peninsula Connection Bridge
This design acts as a structural bridge connecting the home’s existing back porch or patio directly to the pool. Instead of a sprawling deck that encompasses the whole yard, a 10 to 12 foot wide “peninsula” extends outward. This creates a strong visual axis line from the house to the water. It concentrates the budget on premium materials for a single, high traffic corridor.
10. The Bi Level Threshold Entry
This configuration addresses a common problem with above ground pool decks: the massive first step up from the grass. A bi level design introduces a spacious, ground hugging landing pad (perhaps 12 inches high) before the main staircase ascends to the pool level. This intermediate platform serves as a functional “mudroom” for the yard, capturing grass clippings and providing a spot to remove sandy flip flops before entering the clean deck zone.
11. The Equipment Screen Facade
Instead of building a deck to the pool, this design builds a deck wall beside the pool. It is a vertical architectural screen constructed of the same decking material as the main platform. It stands between the pool and the utility area of the yard, hiding the filter, pump, and hoses. This creates a clean sightline from the house and acts as a windbreak for the pool surface.
12. The Cantilevered Sun Shelf
In this design, the deck extends approximately 4 to 6 inches over the pool water, completely obscuring the top rail from the perspective of a swimmer or someone standing on the deck. To achieve this safely, the joists must be designed with a back span ratio of at least 3 to 1 (for every 1 foot of overhang, there must be 3 feet of joist anchored behind the beam). This creates a clean, sharp edge that resembles the concrete coping of a high end inground pool.
Material and Surface Upgrades
The substance of the deck dictates the longevity and barefoot experience. These ideas focus on the surface underfoot.
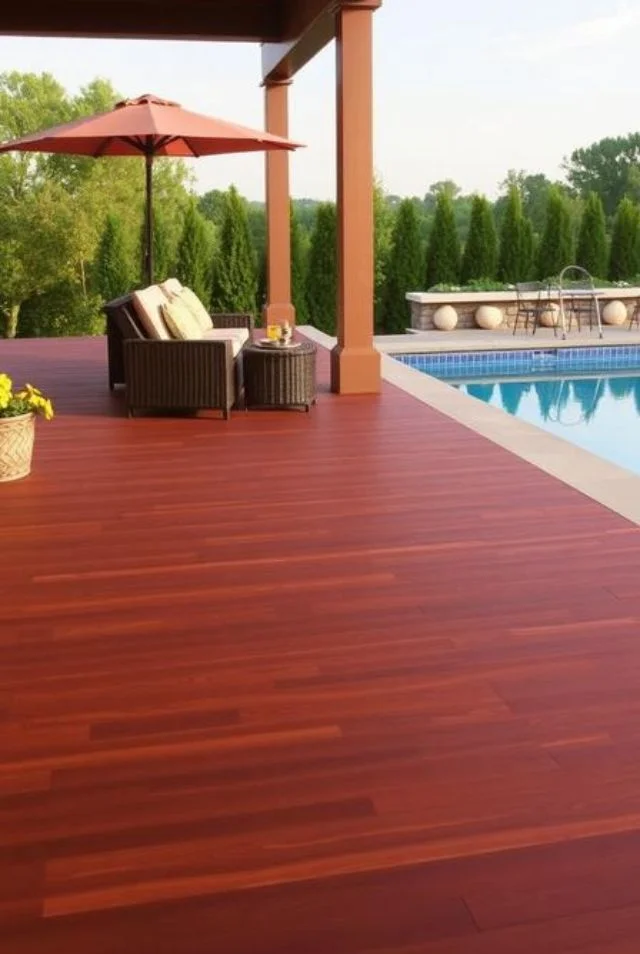
13. The Seamless Composite Monolith
Premium capped composite decking (wood flour core wrapped in polymer) offers the most consistent color and the lowest maintenance profile for a pool environment. Unlike wood, it will not leach tannins onto the pool liner or produce splinters. Using a hidden fastener system is non negotiable here. The absence of visible screws on the surface creates the illusion of a single, uninterrupted plane of material, which is essential for mimicking indoor flooring quality.
14. The Thermal Conscious PVC Option
For pools in full sun exposure, standard composites can retain significant heat on bare feet. Capped polymer decking (PVC) lacks the dense wood flour core, allowing it to dissipate heat faster. It is also 100% impervious to the corrosive effects of splash out from saltwater chlorine generators. It is a premium investment that solves the two biggest complaints about decking near water: heat retention and chemical degradation.
15. The Stained Timber Patina
If budget constraints limit the project to pressure treated pine, the difference between a “temporary” look and a “built in” look lies entirely in the finishing schedule. Allow the lumber to dry for a full season (or purchase kiln dried after treatment, KDAT). Sand the surface to 80 grit. Apply a high quality, penetrating oil based stain (semi transparent) in a color like “Cape Cod Gray” or “Dark Walnut.” This finish absorbs into the wood fibers rather than forming a plastic film that will peel in the first year.
16. The Staggered Width Pattern
Instead of running all 5.5 inch wide deck boards in uniform parallel lines, this design incorporates a pattern using boards of varying widths (e.g., 3.5 inch, 5.5 inch, and 7.25 inch) or a herringbone inset. This breaks up the linear repetition of the deck surface. It draws the eye inward toward the pool and makes the deck feel more like an interior hardwood floor layout than a standard exterior dock.
17. The Ribbon Board Inlay
Using the same species of wood but a different stain color, or using a contrasting composite color, a “ribbon” board is inlaid 12 inches back from the pool’s edge. This creates a visual frame that encircles the water. It acts as a warning track, a subtle visual cue that you are approaching the edge of the deck and the drop off to the pool coping.
Architectural Lighting and Railings
Safety barriers and illumination are not afterthoughts; they are the jewelry of the deck.
18. The Glass Balustrade Horizon
Wooden balusters create a visual cage. Tempered glass railing panels (minimum 1/4 inch thick, heat soaked tested) provide the same code compliant fall protection while being optically invisible. This is the single most effective upgrade for a small yard. By removing the vertical lines of a wood balustrade, the yard visually expands, and the pool remains the undisputed focal point from any angle.
19. The Under Nosing Illumination
Safety lighting is required, but it doesn’t have to be harsh. This idea routes low voltage LED tape light within a dedicated aluminum channel underneath the bullnose of the deck stair treads. The light washes down the face of the riser. This provides ample illumination for navigating steps at night without creating a glare that reflects off the water surface and obscures the view of the pool.
20. The Built In Niche for Cover Storage
Every above ground pool requires a winter cover or a solar blanket. A creative deck design incorporates a long, narrow hatch built into the deck surface near the pool edge. This hatch opens to a sloped, lined “trough” where the rolled up solar cover can be stored flush with the deck surface during the day, completely out of sight and out of the way.
21. The Vertical Skirt as a Feature Wall
The space between the ground and the deck joists is not just an area to hide with lattice. Frame it as a solid wall and clad it with horizontal composite boards (matching the deck surface) or a high quality cementitious panel. By treating the skirt as an architectural wall rather than an afterthought, you give the entire pool structure the visual mass and permanence of a true building foundation.
Comparative Analysis of Decking Substrates
The environment around a pool is chemically aggressive. Understanding how materials react to constant water exposure and UV radiation prevents premature failure.
Natural Wood (Pressure Treated Southern Yellow Pine)
While cost effective initially, this material undergoes a significant dimensional change during its first year outdoors. It twists, cups, and checks. For a deck that must maintain a precise 1/2 inch gap to a metal pool wall, this movement is problematic. If using wood, select KDAT (Kiln Dried After Treatment) lumber. It is more stable from day one and accepts stain immediately. Expect to clean and recoat the surface every 18 to 24 months to maintain a “built in” aesthetic rather than a “weathered farmhouse” look.
Cedar and Redwood
These species contain natural tannins and oils that resist rot, but they are extremely soft. Dragging a pool cleaner hose or a chair across a cedar deck will score and gouge the surface. Furthermore, the tannins in cedar will bleed a dark, rusty colored residue when wet. This residue will stain a vinyl pool liner if not managed. A clear penetrating sealer is required to lock these tannins in place.
Capped Composite
This is the industry standard for a reason. The inner core provides structural rigidity while the outer polymer cap resists fading and staining. The critical detail with composite is joist spacing. For diagonal installations, 12 inches on center is mandatory. For standard perpendicular runs, 16 inches on center is the maximum. Ignoring this will result in a “spongy” deck that telegraphs the joist locations beneath your feet within two summers.
PVC (Polyvinyl Chloride) Decking
This material contains zero organic matter. It cannot rot, absorb water, or support mold growth. It is approximately 30% lighter than composite, which reduces the dead load on the deck framing. Its thermal properties are superior for barefoot comfort in direct sun. The only trade off is the price point and the need for extra lateral joist bracing due to the material’s flexible nature.
Engineering a Freestanding Structure
The most critical technical distinction between a typical backyard deck and an above ground pool deck is that the pool structure itself must never bear the load of the deck.
The Freestanding Mandate
The walls of an above ground pool are designed to hold back thousands of gallons of outward water pressure. They are not designed to support inward or downward deck loads. Attaching a ledger board or joist hangers directly to the pool’s top rail or uprights is a structural failure waiting to happen. As water temperature changes and the pool walls expand and contract, a rigidly attached deck will either tear the pool wall open or wrench the deck footings out of the ground. A consistent air gap of 1/2 inch to 1 inch must be maintained between all deck framing members and the pool’s metal components.
Footing Depth and Frost Heave
In regions where the ground freezes, concrete footings must extend below the established frost line. If footings are poured too shallow, the freeze/thaw cycle of the soil will lift the deck unevenly. Because the pool is sitting on a bed of sand that also moves, a shifting deck can become a battering ram against the pool wall. For a truly permanent installation, the deck footings must be as deep as those required for a house addition.
Load Bearing Capacity
A pool deck is a gathering space. It should be designed for a minimum live load of 60 pounds per square foot (psf). This accounts for the weight of several adults standing shoulder to shoulder as well as the dynamic load of people jumping or moving quickly. This is achieved not just with joist size (minimum 2×8 for spans under 10 feet) but with the hardware connecting the beam to the post. Beams must rest on top of the posts, secured with a structural post cap connector. Bolting the beam to the side of a post puts the entire load of the party on the shear strength of the bolts, which is a common point of failure in DIY builds.
Execution Protocol for a Lasting Installation
Turning the concept into a safe, permanent structure requires a rigorous, sequential process.
Phase 1: Site Analysis and Utility Marking
Before any layout begins, verify property line setbacks via a current survey. Contact the local “Call Before You Dig” service to identify buried electrical, gas, and communication lines. A deck that encroaches on a utility easement is subject to removal at the owner’s expense.
Phase 2: The Layout Grid
Use batter boards and mason’s string to establish the exact outer perimeter of the deck. Since the pool is round and the deck likely faceted, this grid is used to triangulate the center of every footing hole. A laser level is essential here to ensure the top of the finished deck will be exactly level with the pool’s top rail on all sides.
Phase 3: Pier Installation
Excavate holes to the required depth and diameter. Use a cardboard concrete form tube (Sonotube) to bring the concrete pour 4 to 6 inches above the surrounding grade. This creates a “mushroom cap” that prevents ground water from pooling around the post base. Slope the top of the concrete slightly away from the anchor bolt to shed water.
Phase 4: Framing with Hangers
Use only hot dipped galvanized or stainless steel connectors. Electroplated zinc hardware (the shiny silver screws at big box stores) will rust to dust within three years near pool chemicals. Install joist hangers with the manufacturer’s specified fasteners. A common error is using roofing nails in a joist hanger; these have almost zero withdrawal strength. Structural screws are mandatory.
Phase 5: Lateral Stability Measures
A freestanding deck elevated 4 feet off the ground is a giant lever. Wind load and the movement of people can cause the deck to sway side to side. Install diagonal bracing (2×4 lumber or steel tension ties) in a “V” or “X” pattern between the posts on at least two sides of the deck. This locks the structure into a rigid box.
Phase 6: Decking Installation and Expansion
Begin laying deck boards at the pool edge, working outward. This ensures the most critical and visible board (the one meeting the water) is a full, uncut width. Use a jig to maintain a perfect 3/16 inch gap between boards. When you reach the outer edge, a clean, continuous fascia board (minimum 1×8 or 1×10) hides all the cut ends of the decking and the joist structure.
Conclusion
The journey from a standard Above ground pool deck to a landscape masterpiece is measured in inches and joist hangers, not just square footage. It requires a shift in thinking: viewing the deck not as an accessory, but as the architectural casing that defines the space. By adhering to the freestanding structural requirement, selecting materials suited for the harsh microclimate of a pool deck, and applying the specific aesthetic details outlined in these 21 ideas, you create more than just a place to stand. You create the permanent, grounded, and luxurious environment that transforms the act of swimming into an experience of place.
FAQs
1. Can I attach an above ground pool deck directly to the pool wall?
No. The deck must be completely freestanding with a 1/2 inch gap; attaching it to the pool wall will damage the structure and void warranties.
2. What is the best decking material to use around a saltwater pool?
Capped polymer (PVC) decking is best as it contains no wood fibers and is entirely impervious to corrosion from salt splash out.
3. How do I make an above ground pool look like an inground pool?
Build a flush mount deck that cantilevers slightly over the top rail to hide the metal coping completely from view.
4. What is the required joist spacing for composite decking around a pool?
For composite decking, joists must be spaced 12 inches on center for diagonal runs and 16 inches on center for standard perpendicular layouts.
5. Do I need a permit to build an above ground pool deck?
Yes, most jurisdictions require a permit for any deck over 30 inches high or larger than 200 square feet due to load safety codes.

As an admin, with a passion for transforming spaces and a sharp eye for design trends, I created Interior Design Style Quiz to help homeowners make confident, informed decisions about their homes from the curb all the way inside.